Flutter State Management made easy with provider 2: Provider as a Dependency Injection framework and MultiProvider

I am a software developer specialized in mobile apps. About a decade ago I started my career as a web developer, but I soon moved into Android native development; however for the last few years I've been building hybrid apps with Flutter. I consider myself a passionate programmer, I enjoy writing clean and scalable code. In addition to developing apps, I also have knowledge of backend services development, web development, installation and maintenance of servers, marketing applied to the growth of web applications... among other things. I also like to create video games in my free time and write about topics that interest me in the technology world: the last tech trends, experiments that I do, and topics regarding user privacy. You can find more about me, my articles and my projects on my website: davidserrano.io
This is the second part of this tutorial series on managing Flutter state with the provider package. In the first part we learned how we can manage the state of our widgets from model classes that inherit from ChangeNotifier, as well as the use of ChangeNotifierProvider to be able to provide our widget tree with said classes, and finally the use of the Consumer class to be able to read these state changes and react to them.
In this second part we will delve into the following concepts:
- First we'll see how to make multiple widgets react based on a single state provider
- We will learn how to use provider as a dependency injection framework
- Finally, we will use
MultiProviderto make our code more readable
If you want to learn how to manage state with provider and haven't read the first part yet, I suggest you take a look at it here first. If you have already read it and are ready to continue learning, here we go.
Manage the state of multiple widgets with a single state provider
Let's start with the test app from the previous tutorial, you can clone, download or fork it from here.
We have the basic counter app. What I want to achieve is to be able to keep that numeric count and show it in different widgets, and I also want to be able to increase it from all those widgets.
First, copy MyHomePage from main.dart into a new second_counter.dart file, and rename it to SecondCounter, like so:
// lib/second_counter.dart

import 'package:flutter/material.dart';
import 'package:flutter_state_management_easy_provider/main_model.dart';
import 'package:provider/provider.dart';

class SecondCounter extends StatefulWidget {
  const SecondCounter({Key? key, required this.title}) : super(key: key);

  final String title;

  @override
  State<SecondCounter> createState() => _SecondCounterState();
}

class _SecondCounterState extends State<SecondCounter> {
  @override
  Widget build(BuildContext context) {
    return ChangeNotifierProvider(
      create: (_) => MainModel(),
      child: Consumer<MainModel>(
        builder: (context, model, child) => Scaffold(
          appBar: AppBar(
            title: Text(widget.title),
          ),
          body: Center(
            child: Column(
              mainAxisAlignment: MainAxisAlignment.center,
              children: <Widget>[
                const Text(
                  'You have pushed the button this many times:',
                ),
                Text(
                  '${model.counter}',
                  style: Theme.of(context).textTheme.headline4,
                ),
              ],
            ),
          ),
          floatingActionButton: FloatingActionButton(
            onPressed: () => model.counter++,
            tooltip: 'Increment',
            child: const Icon(Icons.add),
          ),
        ),
      ),
    );
  }
}
Now add a new element to the Column of MyHomePage in the form of a button to open this new screen:
// main.dart

// [...]

class MyHomePage extends StatefulWidget {
  const MyHomePage({Key? key, required this.title}) : super(key: key);

  final String title;

  @override
  State<MyHomePage> createState() => _MyHomePageState();
}

class _MyHomePageState extends State<MyHomePage> {
  @override
  Widget build(BuildContext context) {
    return ChangeNotifierProvider(
      create: (_) => MainModel(),
      child: Consumer<MainModel>(
        builder: (context, model, child) => Scaffold(
          appBar: AppBar(
            title: Text(widget.title),
          ),
          body: Center(
            child: Column(
              mainAxisAlignment: MainAxisAlignment.center,
              children: <Widget>[
                const Text(
                  'You have pushed the button this many times:',
                ),
                Text(
                  '${model.counter}',
                  style: Theme.of(context).textTheme.headline4,
                ),
                // Add this button to open SecondCounter
                Padding(
                  padding: const EdgeInsets.only(top: 20.0),
                  child: TextButton(
                    child: const Text('Open counter 2'),
                    onPressed: () => Navigator.push(
                      context,
                      MaterialPageRoute(
                        builder: (context) => const SecondCounter(
                          title: 'Second counter',
                        ),
                      ),
                    ),
                  ),
                )
              ],
            ),
          ),
          floatingActionButton: FloatingActionButton(
            onPressed: () => model.counter++,
            tooltip: 'Increment',
            child: const Icon(Icons.add),
          ),
        ),
      ),
    );
  }
}
Try running the app. Try incrementing the counter value, and then go to the second screen and try incrementing the counter value from there. What's the result? Well, we have two screens and each one with an independent value, and that is not what we want. Why is this happening? Well, the reason is that we are actually creating two instances of MainModel, one in MyHomePage and a different one in SecondCounter, each of which is provided to its descendant widgets via a ChangeNotifierProvider.
In order to have a unique count in the entire application, what we will have to do is move that ChangeNotifierProvider one level up until both screens hang from it, for example we could place it just above MyHomePage, in the class that wraps MaterialApp (main.dart file):
// main.dart

// [...]

void main() {
  runApp(const MyApp());
}

class MyApp extends StatelessWidget {
  const MyApp({Key? key}) : super(key: key);

  @override
  Widget build(BuildContext context) {
    return ChangeNotifierProvider<MainModel>(
      create: (_) => MainModel(),
      child: MaterialApp(
        title: 'Flutter State Management Basic',
        theme: ThemeData(
          primarySwatch: Colors.blue,
        ),
        home: const MyHomePage(title: 'Flutter State Management Basic'),
      ),
    );
  }
}

// [...]
Now, remove the ChangeNotifierProvider from MyHomePage and SecondCounter, so that the build() methods directly return the Consumer<MainModel>.
Run the app again and try to increment the counts, you will see that now there is only one unique count. This is because there is only one MainModel instance, and any widget below the ChangeNotifierProvider that provides it can access it to consume its state.
Provider as a dependency injection framework
Dependency injection is a software development technique in which the dependencies of a class are injected from the outside instead of being instantiated inside it. I could write several articles about this technique and its applications, but in order to understand each other and to focus on the topic at hand, we are going to learn how to use provider to create an instance and include it in the widget tree so that it can be used from anywhere in the app.
To do this, I am going to give an example of the logs package that I use, logger. What I want to do is create an instance and write a log trace when the counter is incremented on the first screen and also on the second screen, and I want that instance to be shared across the app. The first thing will be to install the package:
flutter pub add logger
We are now going to use the Provider class to accomplish this task. This is the basic class that gives this package its name, in fact both ChangeNotifierProvider and other types of providers that we are going to see in this series of tutorials are variations or forms of this original class:
// main.dart

// [...]

void main() {
  runApp(const MyApp());
}

class MyApp extends StatelessWidget {
  const MyApp({Key? key}) : super(key: key);

  @override
  Widget build(BuildContext context) {
    return ChangeNotifierProvider<MainModel>(
      create: (_) => MainModel(),
      child: Provider<Logger>(
        create: (_) => Logger(),
        child: MaterialApp(
          title: 'Flutter State Management Basic',
          theme: ThemeData(
            primarySwatch: Colors.blue,
          ),
          home: const MyHomePage(title: 'Flutter State Management Basic'),
        ),
      ),
    );
  }
}

// [...]
As you can see, to make a 'hole' for this new provider, what we do is chain one inside the other. Now we are going to modify the FloatingActionButton of each screen to, in addition to increasing the count, print a log trace. To get this Logger we just created we use Provider.of<Logger>(context, listen: false). Through this invocation we are indicating the type of the class we want to obtain, we pass the current context and we indicate listen: false. We'll see why this last argument has this value later in this tutorial series, for now leave it set to false:
// main.dart

// Alter the existent FloatingActionButton:
floatingActionButton: FloatingActionButton(
  onPressed: () {
    model.counter++;
    Provider.of<Logger>(context, listen: false).d(
      'Increment counter from MyHomePage',
    );
  },
  tooltip: 'Increment',
  child: const Icon(Icons.add),
),
// second_counter.dart

// Alter the existent FloatingActionButton:
floatingActionButton: FloatingActionButton(
  onPressed: () {
    model.counter++;
    Provider.of<Logger>(context, listen: false).d(
      'Increment counter from SecondCounter',
    );
  },
  tooltip: 'Increment',
  child: const Icon(Icons.add),
),
As you can see, through the Provider class you can provide the instances of the classes that you want to any Widget of your application.
Make the code more readable using MultiProvider
What we have seen today is very good and very useful, but note that normal applications do not have only 2 dependencies as we have in this example, they can have 5, 10, 100 or more different dependencies. Imagine how each of them would be included in the next one, as we have now in MyApp, it would be very difficult to maintain and read, and this is why MultiProvider exists.
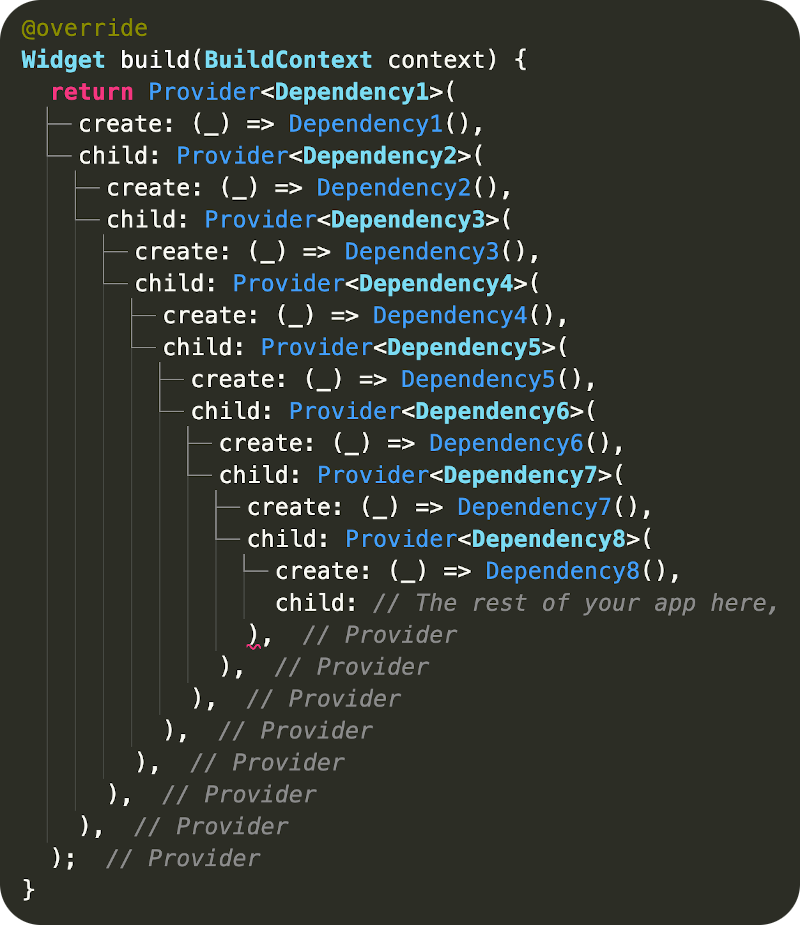
MultiProvider is a way to declare all your providers in an array. Let's see it in action, modify MyApp as follows:
// main.dart

// [...]

void main() {
  runApp(const MyApp());
}

class MyApp extends StatelessWidget {
  const MyApp({Key? key}) : super(key: key);

  @override
  Widget build(BuildContext context) {
    return MultiProvider(
      providers: [
        ChangeNotifierProvider<MainModel>(create: (_) => MainModel()),
        Provider<Logger>(
          create: (_) => Logger(),
        ),
      ],
      child: MaterialApp(
        title: 'Flutter State Management Basic',
        theme: ThemeData(
          primarySwatch: Colors.blue,
        ),
        home: const MyHomePage(title: 'Flutter State Management Basic'),
      ),
    );
  }
}

// [...]
That's much better. Each provider is an element of the array provided in the providers argument, so your code will be much better organized. Each of the providers specified in that array will be available to your application, exactly as before.
Conclusion
In this second tutorial we have delved into the basic concepts of the provider package. We have seen how to manage state at different points using a single ChangeNotifier located at the top of the widget tree. We have also used Provider to provide single instances to the application and have arranged all our providers with MultiProvider.
The provider package contains other providers that can make your life easier while developing, I will cover them in the following chapters of this tutorial series.
If you have any questions or suggestions do not hesitate to leave me a comment below.
You can find the final app of this tutorial here.
Thanks for reading and happy coding :)